Using an iPhone or Android for photos? Good idea because they have a superb camera. Cell phone cameras rival a professional SLR of just a few years ago. Here are some tips for taking better photos of your model using your cell phone.

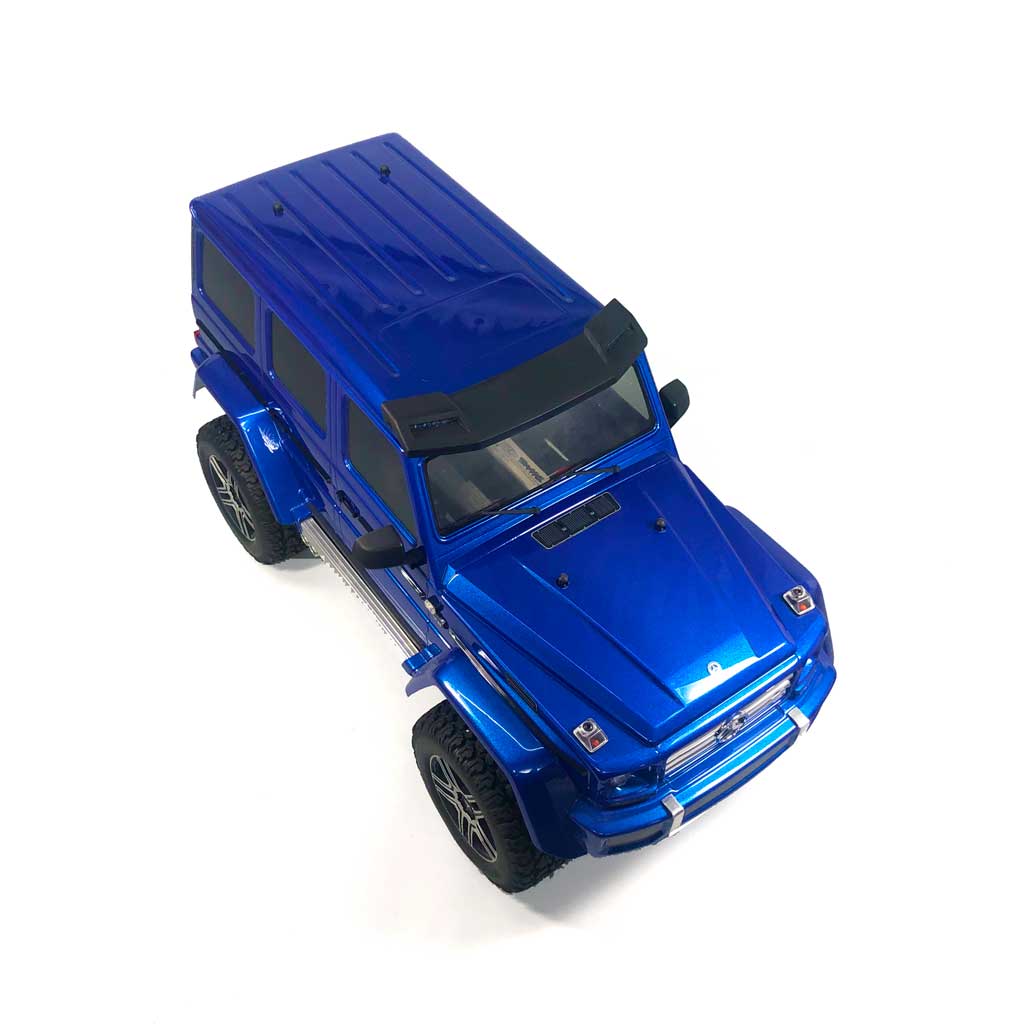
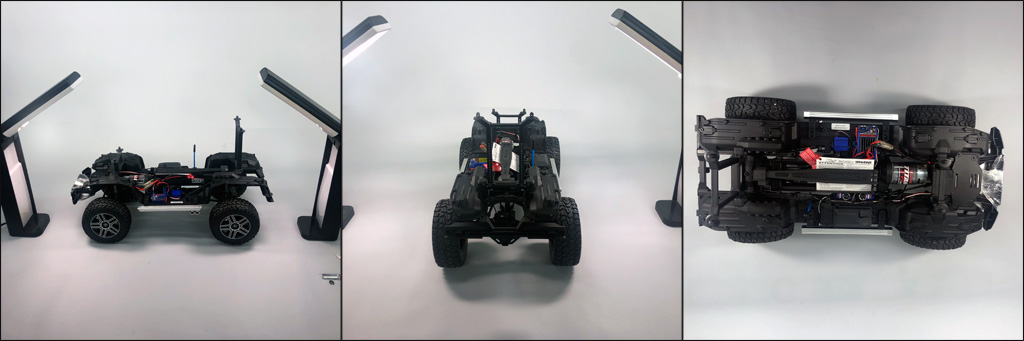
The secrets to taking better cell-phone photos of your model airplane, truck, or boat involve framing for perspective to trick the eye into seeing in 3D, on what is inherently a 2D-medium, a flat screen. This brief how-to article demonstrates how to achieve perspective photo, plus how to better achieve good framing, and focus. How? By using various models like a Traxxas TRX-4 model of a Mercedes G-500, a highly customized Arrma Limitless, plus photos of various 3D model airplanes like an Extreme Flight Peregrine and Turbo Bushmaster, as well as various racing boats like a Roadrunner.
These photos have an emphasis on getting the details of servo installations plus photos taken in the field, which showcase the models in action. All these, plus grabbing the perfect hero image. You'll also be getting an insider's look at studio tricks showing you how to use an iPhone or Android cell-phone to take great pictures. At last, you get to learn the composition techniques required to improve framing and focus just like a pro. After all, a picture is worth a 1000 words!
So this article is divided into a few segments, first on grabbing those great detail shots like you see on product webpages, plus tips and tricks for the big picture - photos taken at the field - and then tips for getting the perfect hero photo. First up, some how-to tips for taking better detail shots, with specific advice regarding framing and composition to help you get the perfect perspective photo.
Detail photos
The famous 20th-century architecture, Ludwig Mies van der Rohe once said, 'God is in the details'. And he wasn't wrong because it's with detail photos that you share a glimpse into the goodness of a model.
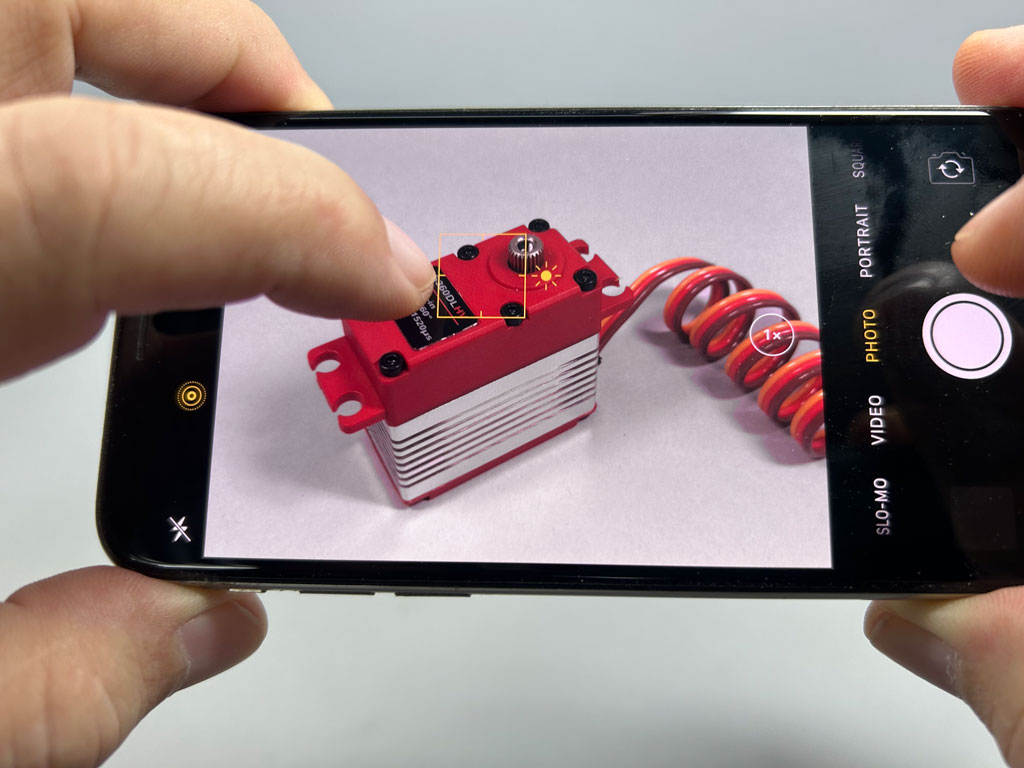
This next photo showcases a pair of cell phones, one held vertically on a tripod in the portrait orientation, the other held where it's wider than tall, the so called landscape orientation. You'll learn to use both.
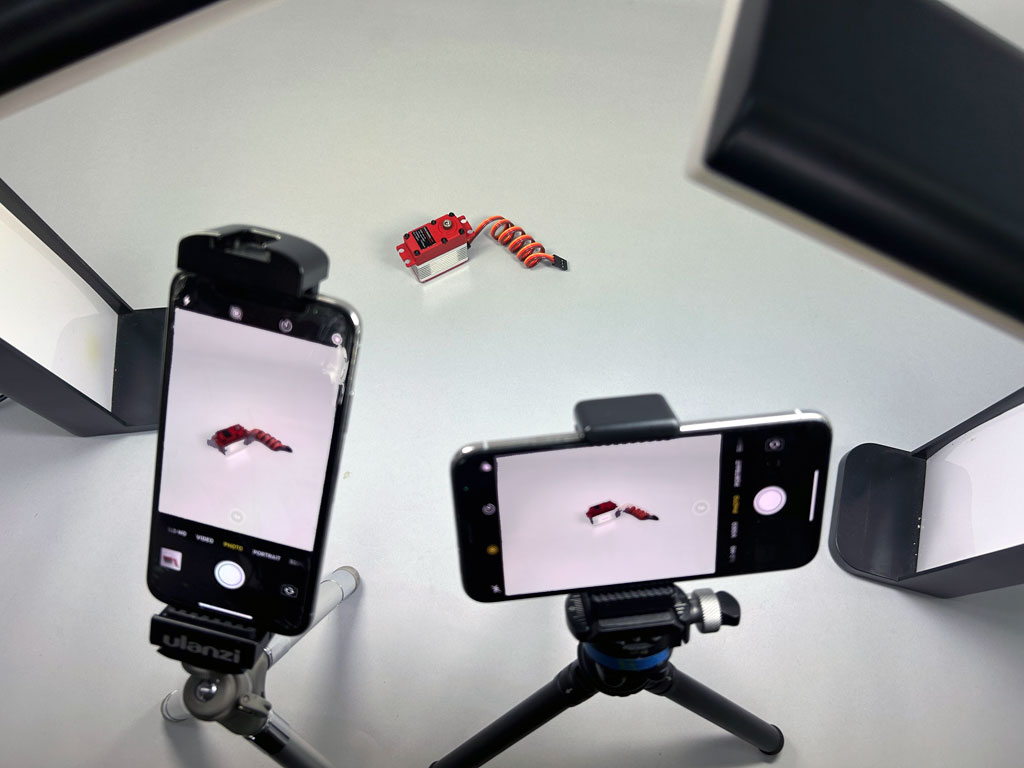
- Both are iPhone X, +6 y/o and counting - on the left is portrait, and on the right is landscape
Orientation - landscape or portrait?
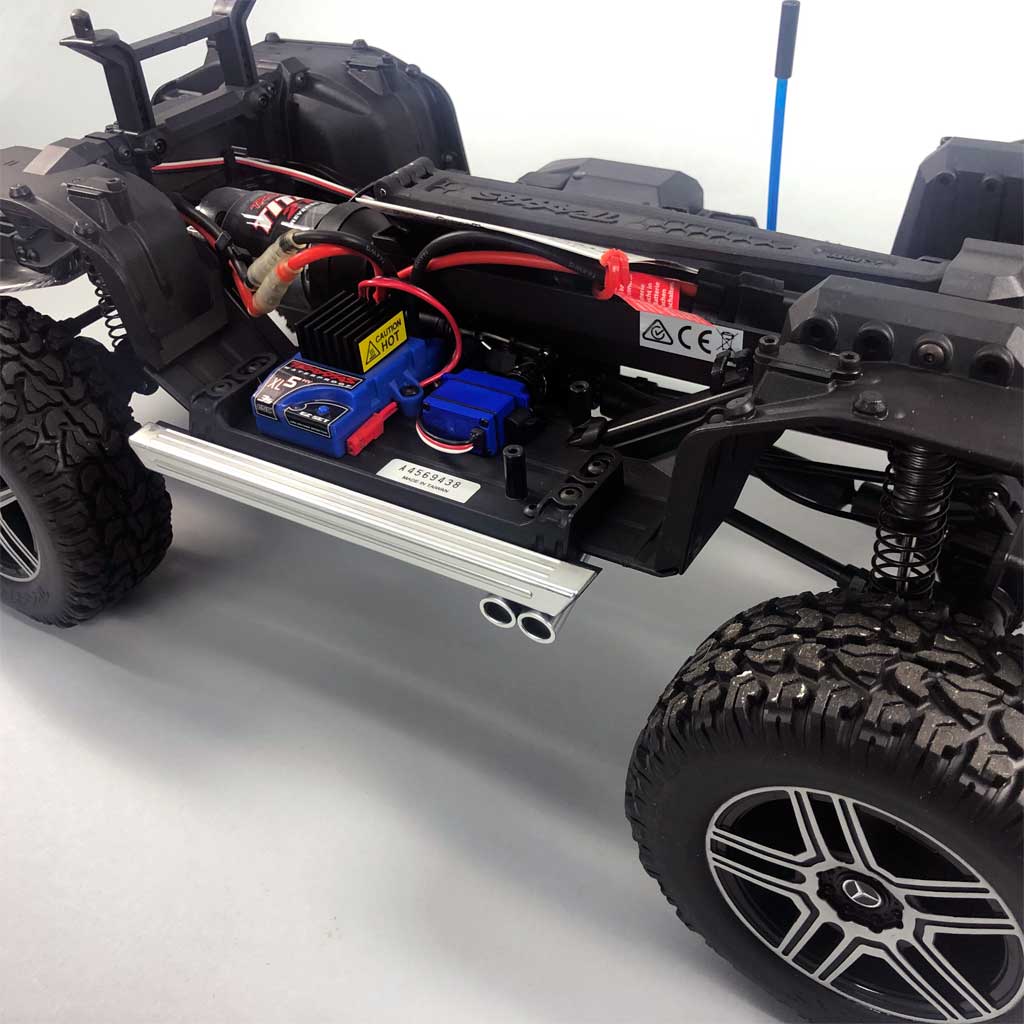
For the most part, when taking photos of servos and control functions (steering servo, associated linkages, throttle servo, rudder, aileron servos - or whatever), just hold the phone horizontal instead of vertical. This is not a hard and fast rule, just in general because it's easier to hold the phone, like a pocket camera, in landscape orientation (or mode).
In the above photo, the phone on the left is in portrait orientation (or selfie mode), where the camera body (and the image sensor itself) are taller than wide. Meanwhile the phone on the right, is positioned in what's called landscape orientation, where the camera body is wider than tall. For product photos, e.g. servos, linkages, etc. you'll be using your phone in landscape mode.
Note: these terms literally date back to when folks took photographs of landscapes versus taking portrait photos of people while holding the camera vertically, like when taking a selfie. Portrait mode, or selfie mode usually has people in it. So remember portrait mode is what you use with a person in the image. Anyway, from there, as long as the subject is well centered and in good focus, you're ready to snap the photo. Easy peasy!
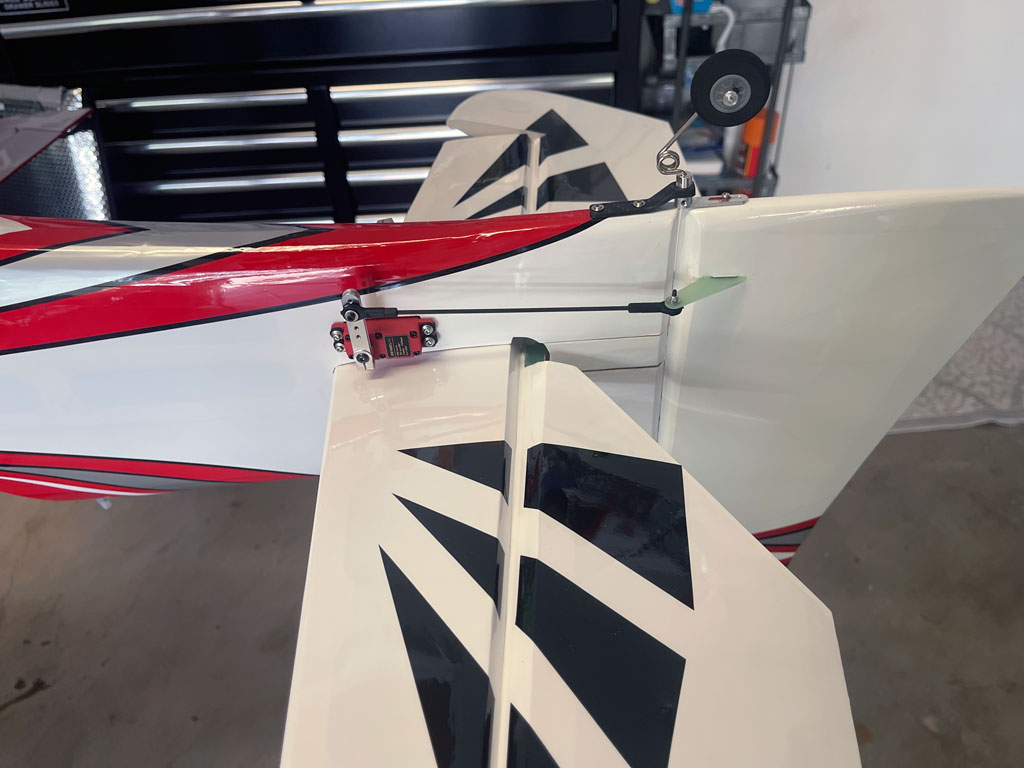
So, in the above studio shot composed of two phones framed to take a servo photo, did you notice in both servo images that the servos are not zoomed very closely?
This is important because the resulting images, which are about 3MB coming from those old-ish phones, still have plenty of pixels so that we can easily zoom in - digitally.This, after the fact so we didn't frame more tightly. Instead, we left plenty of breathing room around the subject (the servo in this instance).
How did we zoom in digitally afterward? By using computer software tools like Adobe Photoshop to zoom in on the image and crop it down to exactly what we wanted to show. So we framed the subject fairly wide, but with a high resolution image we can zoom in digitally, later on the subject as we please.
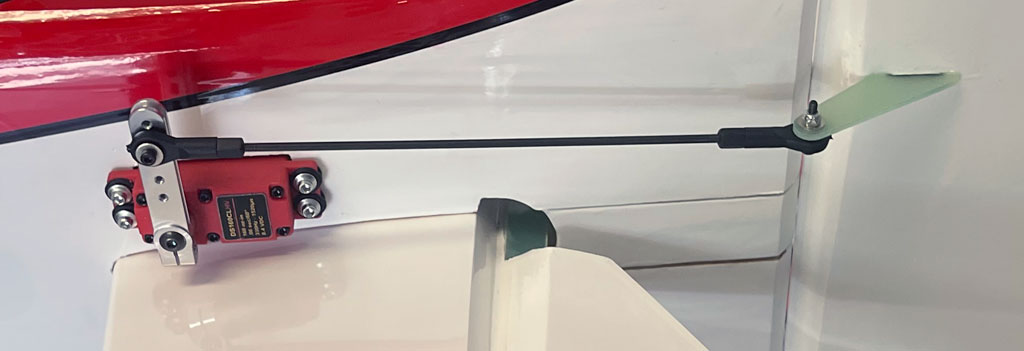
From the above camera photo framing, we zoomed in and cropped it to this result.

Recapping1
Landscape is sensor oriented wider than tall, but holding it 90° to landscape mode is how you hold the sensor for a selfie, where the resulting photo is taller than it is wide. Mostly use this with people in a photo. Same camera, same sensor, just a matter of how you are orienting the camera body (the cell-phone in this case).
Hold it either horizontally (for landscape), or vertically (for portrait mode). You'll do it both ways depending on what you're trying to capture, and I'll explain this a bit further in, but for most shots of model parts, you'll use landscape mode. Next, let's discuss framing.
Framing, or don't get too close!
Above, I touch on framing and mentioned that not being too close to the subject works out just fine with high-resolution images. Because, they have enough pixels where we can zoom in digitally.
And this works great *if* you share the highest resolution photo from the phone (4MB is MUCH better for us than 855KB). So when you select an image to email it to us, you'll get resolution alternatives (to send out), e.g.like 85KB, 230KB, 1.5MB, or 4MB.
From the above example, the one we want is always the biggest, the 4MB image (and it's the only one actually within the phone). Generally, to save bandwidth, the rest of the sizes (85KB, 230KB, 1.5MB) are actually created on the fly by software within the phone.
Anyway, always share the largest image, because this allows us the greatest flexibility in what we can do with it. Here is an example of why this is important.
For this next photo, the photographer sent us a wide shot showing the rudder servo of his Extreme Flight Peregrine. It's a 3MB image.
- 3MB image of the rudder servo of an Extreme Flight Peregrine, a 53" wingspan 3D biplane
And from the above 3MB wide shot, an image many would think framed from too far away (or too wide) to be useful, they would be mistaken. This is because as long as we received a 3MB image, or larger file, e.g. a high resolution image, then here are examples of what we can do from this one photo.
For example, perhaps we desire to focus attention on the servo and linkage . . .
- From a 3MB image, it's digitally zoomed using Adobe Photoshop, and it's still nice image
. . . so here we zoomed and cropped using computer software and there's no pixilization (a ragged soft looking image). This photo is still crisp.So it's still a perfectly useful photo despite zooming in digitally using Photoshop. What's more, now it's being used as a totally different picture than what the photographer shared with us because we're guiding the eyes specifically to the rudder servo and linkage. This shows why framing too tightly, like you may have learned back in the day, is no longer required.
Next, what if instead, we wanted to use another part of the photograph? Perhaps to discuss placement of fuzzy Velcro to preclude positive feedback oscillations . . .
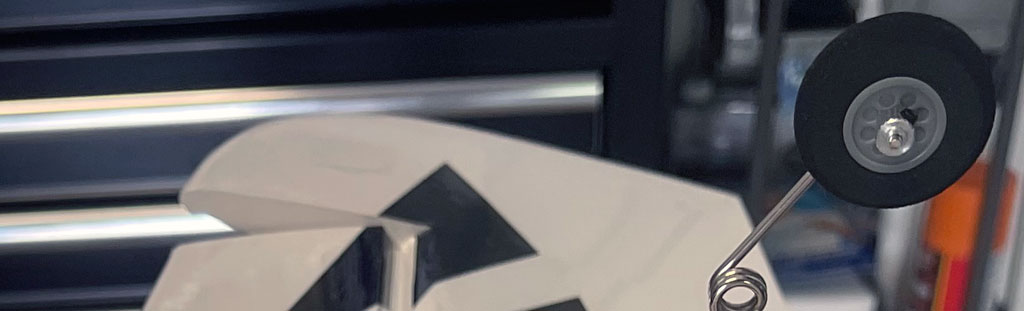
- Same wide photo, but digitally zooming into another part to showcase the aerodynamic tab
. . . so by zooming, plus panning and scanning within the one photo, we were able to get three different images, the original wide shot, and two different detail shots . . . one of the rudder servo and linkage plus one showing the aerodynamic tab on the elevator surface. A total of three uses from one photo!
Unfortunately, had it been framed tightly, e.g. just the servo and linkage because that's what the photographer assumed we wanted, then we would never had the opportunity to tell a more useful the story like we're able to share, understand?
Moral of the story? Don't frame too closely!
Here's another example to nail this subject down. From the first photo comes the second. The idea is to prove to you *definitively* how you don't need to frame the photo too closely for it's Kodak moment.
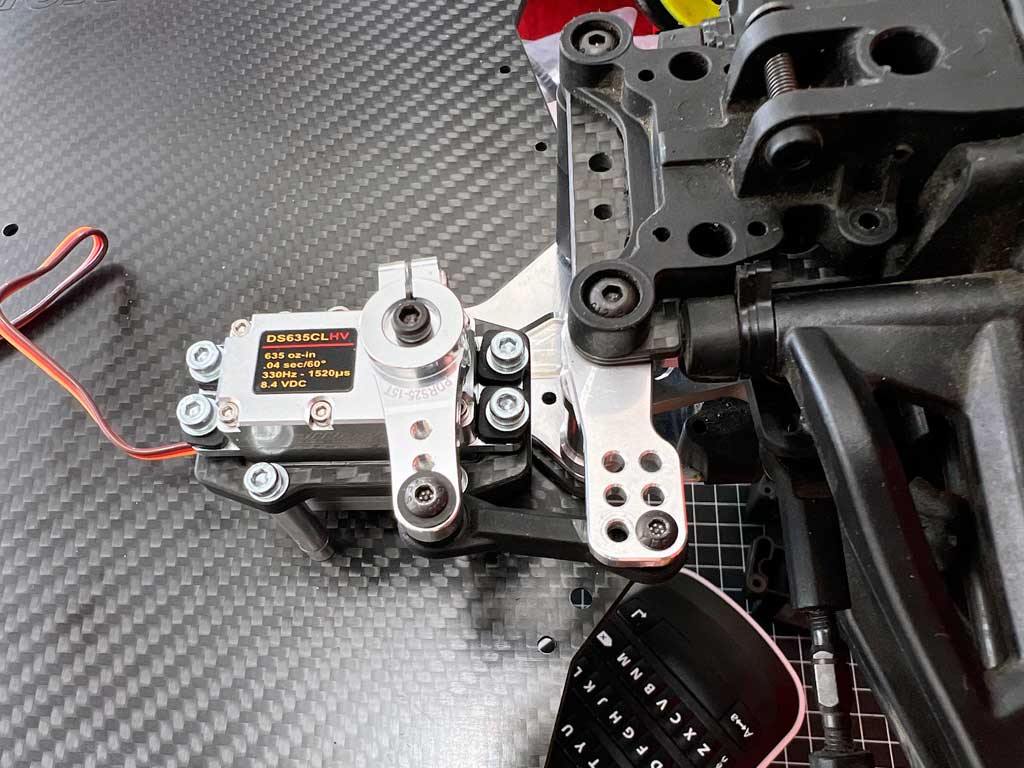
This is a a customized model by Arrma called a Limitless.
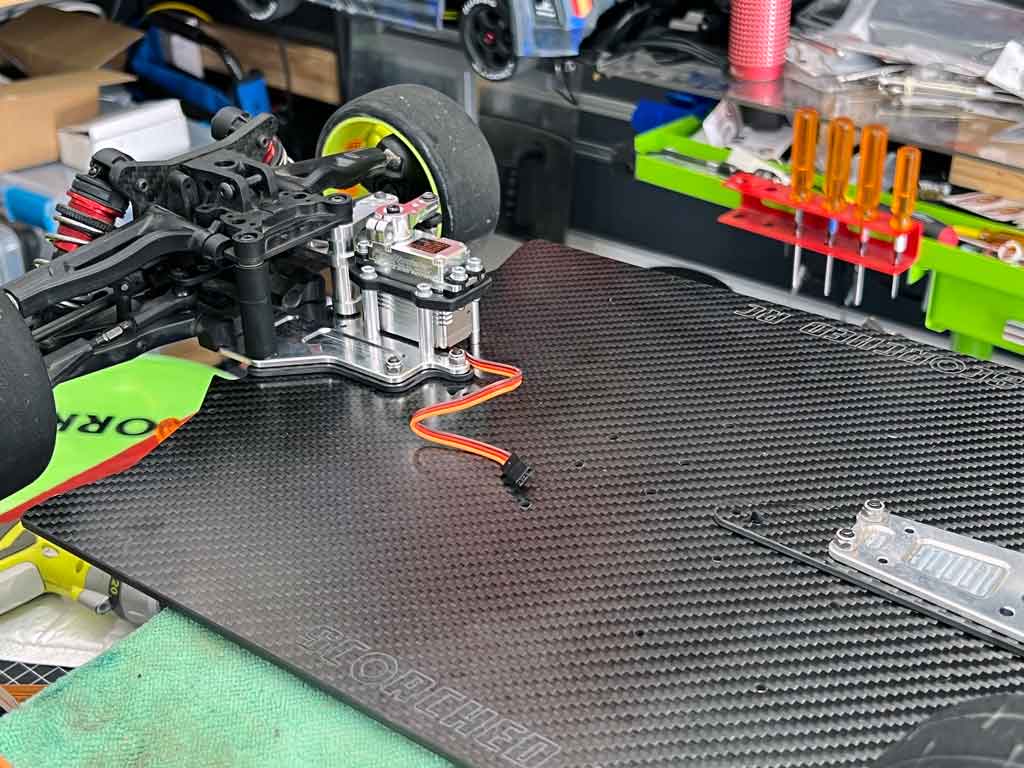
- Nice wide shot of a servo in a customized Arrma Limitless, a model made for hooliganism
So the purpose of the above photo was to show the steering servo. It's a ProModeler DS635BLHV and for a customized rig like this Limitless, it's the perfect choice due to being both powerful and fast.
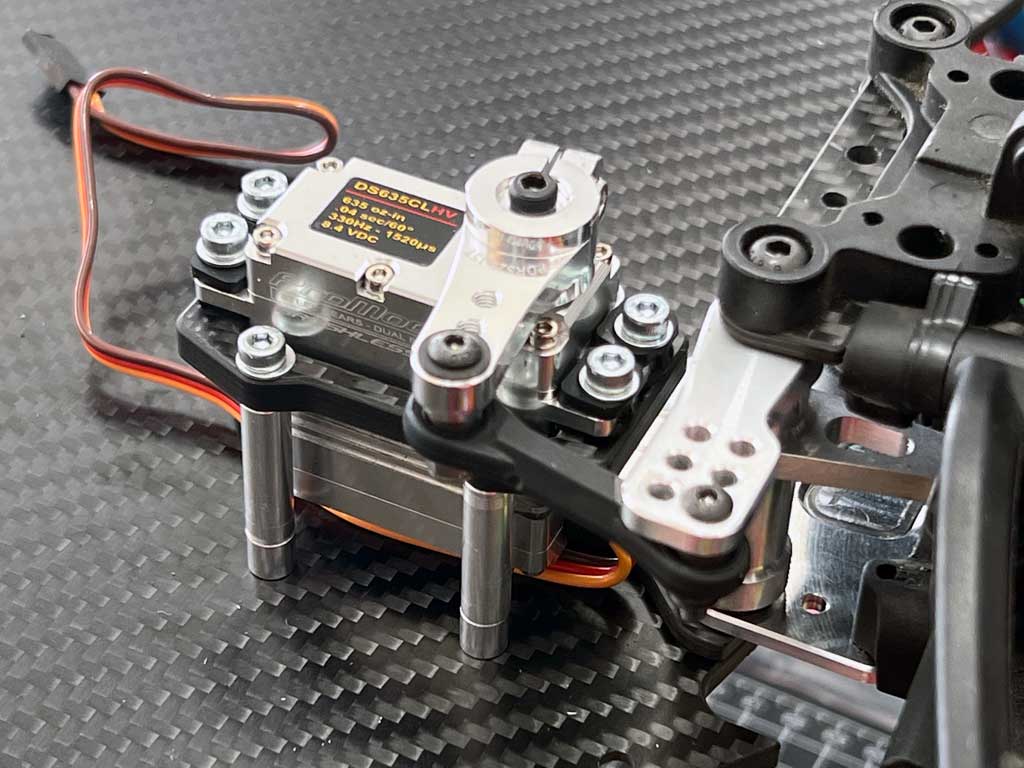
Problem is, for the Limitless article, we needed to showcase the servo by framing it more tightly. Since this began life as a 4MB image, there was no problem whatsoever in zooming in digitally with Photoshop.
And this is how it turned out. Pretty sweet image, eh?
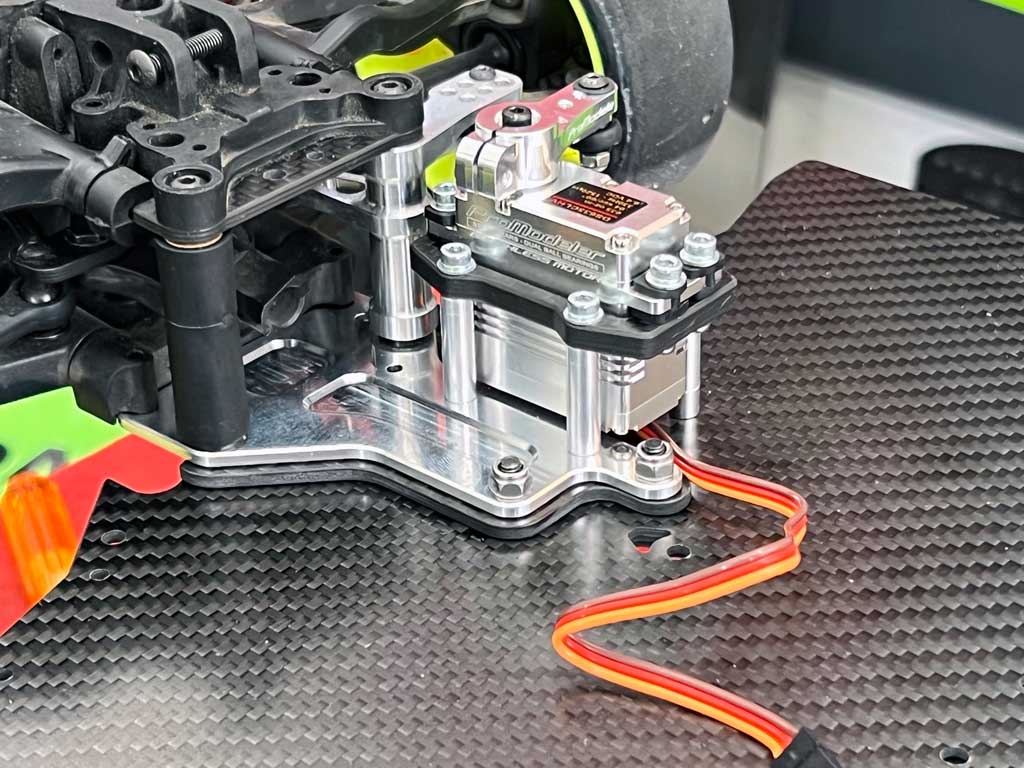
- Nice perspective shot of a DS635BLHV mounted in a custom Arrma Limitless
Recapping2
Both images, the original and the one derived from the wide shot, came from digital manipulation. And it's all because the photographer wisely shared a very high-quality image with us *and* it wasn't framed so closely that it constrained what we could do with it.
We are fortunate these days to be blessed with cell-phone cameras capable of taking up to 10MB images, so had that been a 6MB image instead of a 3MB image, and as long as it was well focused, there's even more I could have done with the one photo. Maybe like zooming in and focusing in on the servo linkage, only.
Heck, let's try it anyway!
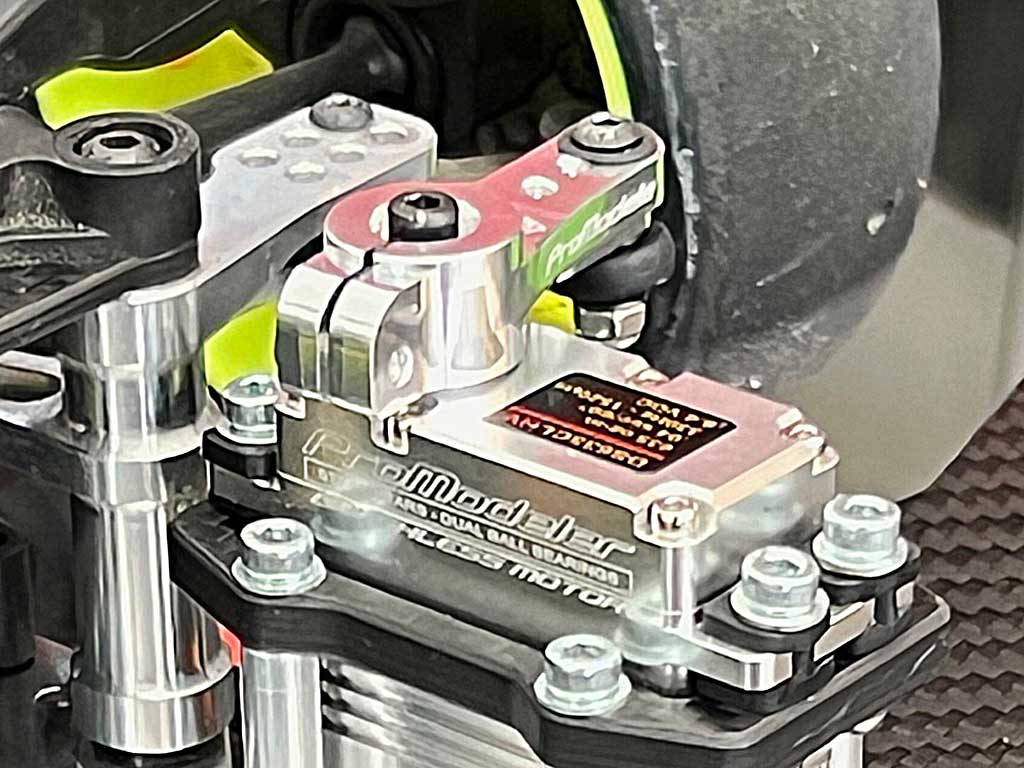
- Here is an XCU (extreme close up) of the original 3MB image and it hung together beautifully
And all this versatility coming from *one* photo. Bottom line? If you give us a well-focused high-resolution image, then we can work wonders. This is the kind of stuff that allows us to weave together an interesting story *and* it's 100% due to the photographer taking the time to make sure the image was well focused (the camera does most of the work) and because he shared the highest image in the camera phone.

One last look at perspective
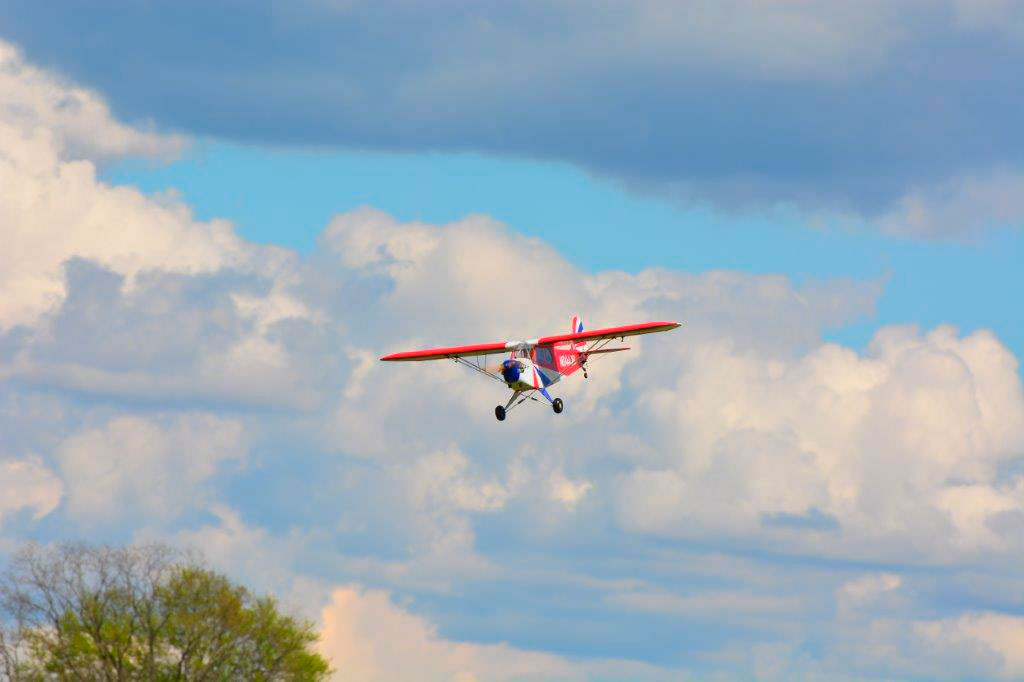
- These are photos, like some customers send, that make me want to cut my veins in despair
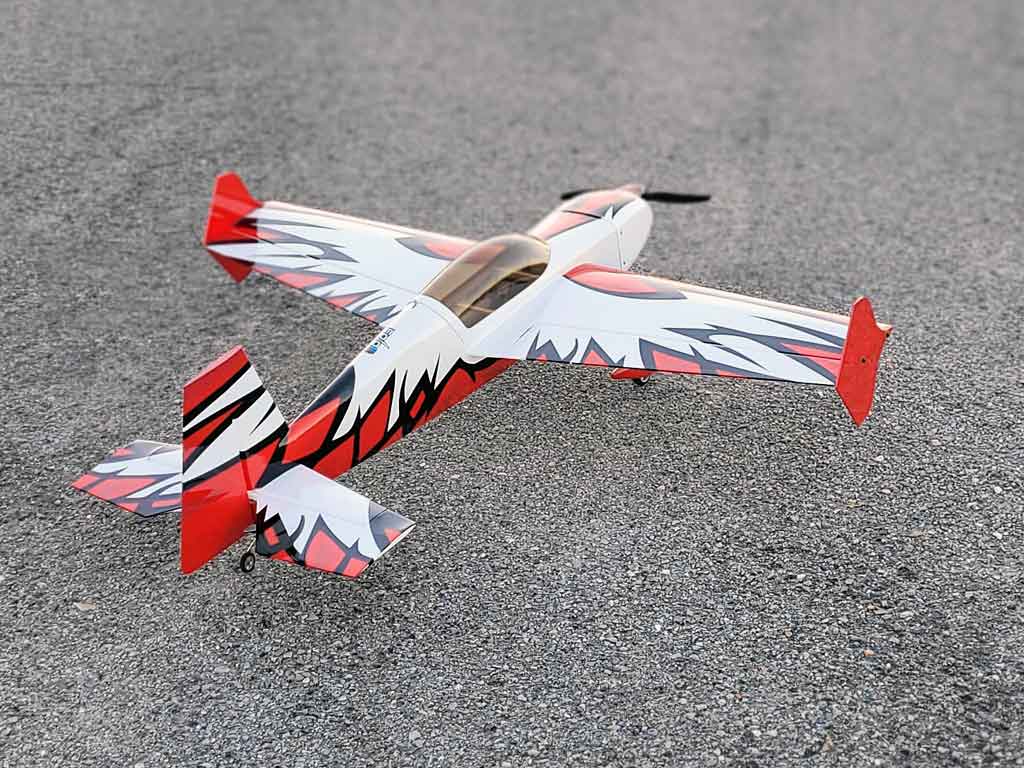
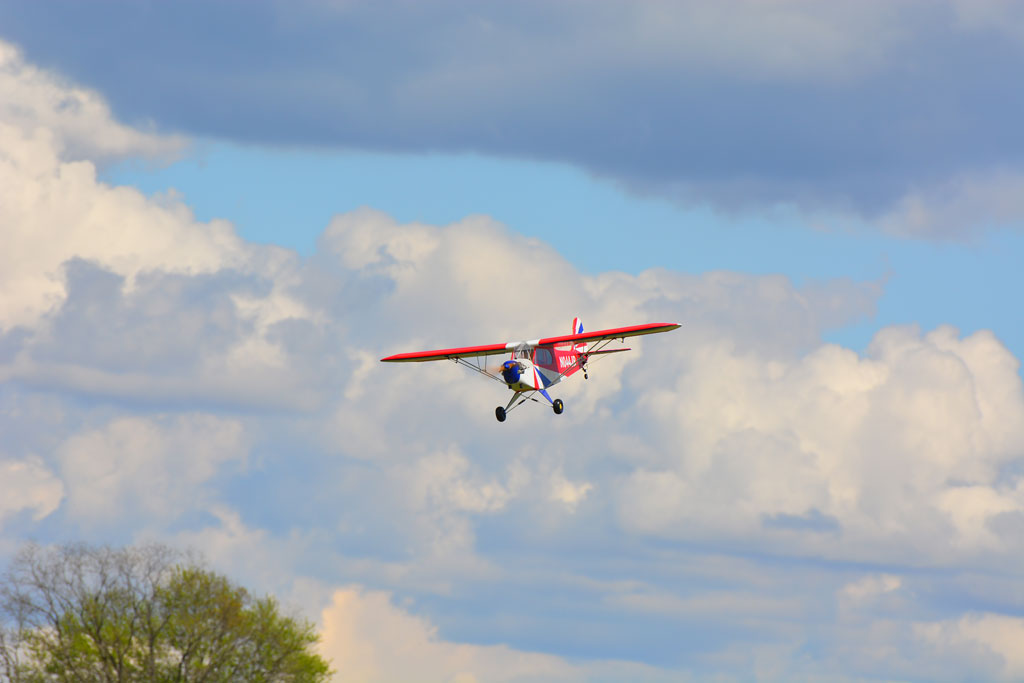
When folks send photos that are side-on, head-on-on, or top-view, we deflate a little bit. There's almost nothing we can do with these and they don't tell a story very well because they lack perspective. This next photo shows perspective because it gives you a bit of a look at the side, the front, and the top all at the same time and effectively fools your eyes into believing you're seeing a 3D object on a 2D display.
- What could have improved this image? A lower angle, shooting it from 30° instead of 60°
So let's get one last look at perspective. Again, we get photos folks share with us all the time showing directly side-on, directly head-on or front-view, and directly overhead, or top-view.
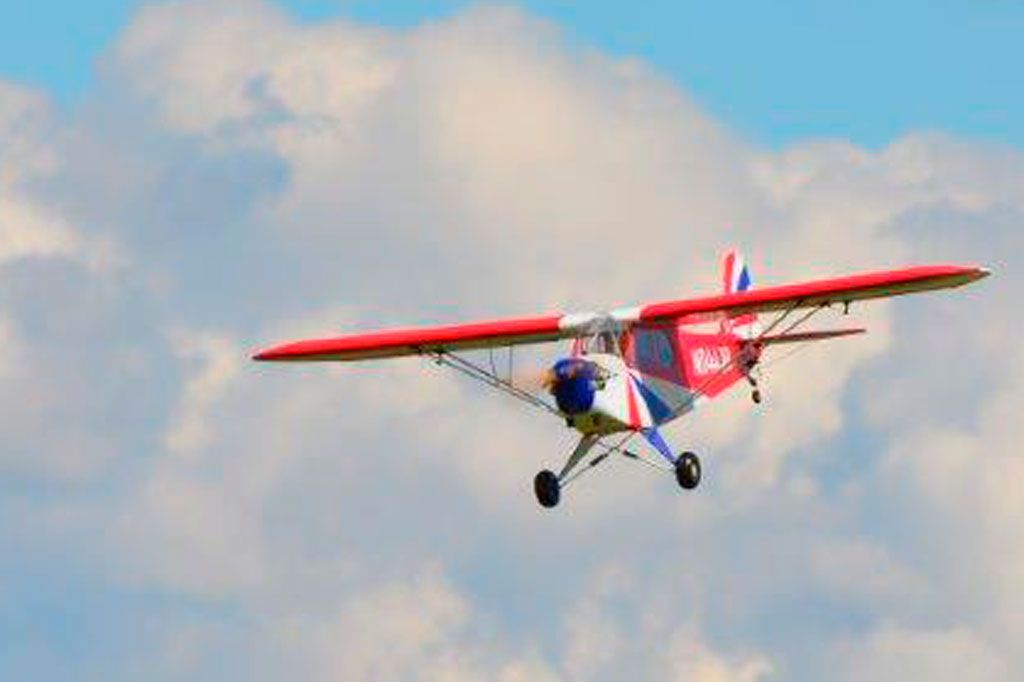
- These types of photos don't convey much info to the brain about what it's looking at
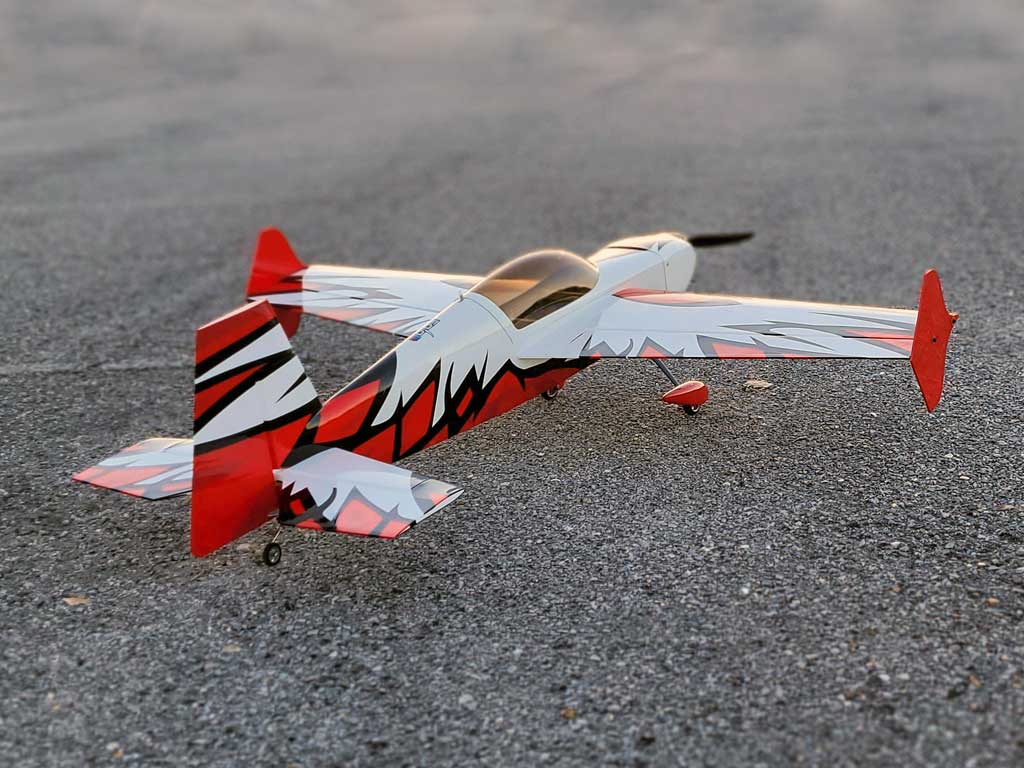
So it's far better when the photo has some angles showing so you get the side, the front (or back), plus an angle from above, all at the same time you create a 3D image for the brain. No, it's not a real 3D image but it does fool the eye into seeing something with depth on a flat surface like a computer monitor or phone.
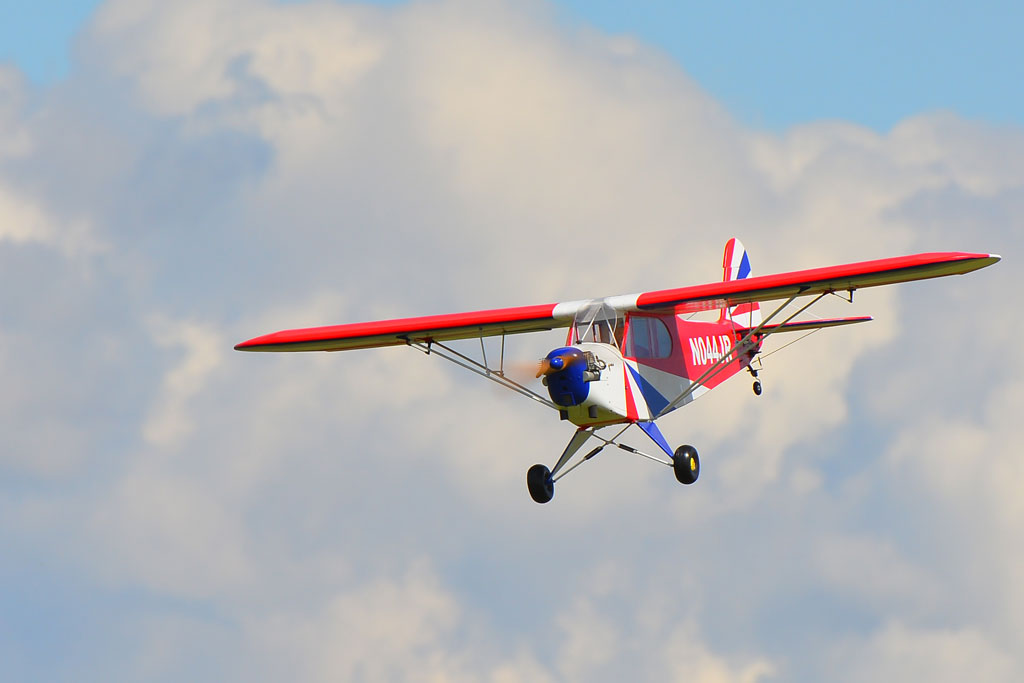
- A photo with perspective fools the eye into believing it's seeing a real image
And when it's a high rez image, we can do more with this kind of photo by using tools like Photoshop to pan and scan as well as zoom into whatever is the focus of attention. Here's another example of zooming when we begin from a high resolution image like the one above.
- Making a photo do double duty is possible when you begin from a 3-5MB image
Focusing
For example, did you know all cell cameras, whether it's a six-year-old Apple iPhone or an Android OS on a phone from Samsung, have some interesting capabilities.
One of my favorites is where you touch the part of the image you want to be focused and it draws a little box to confirm the spot and presto, it's perfectly focused for you!
- Touch to focus is a feature of all phones going back many years ago - I absolutely love this!
So, the major points thus far are the difference between landscape and portrait mode and DO NOT frame the subject too closely, leave that to us.
Instead, always take nice wide shots where you leave plenty of breathing room around the subject, because if you send us the native file (the largest in the camera), then we can zoom in digitally (if need be) and the results still look great!
Look, I know you want to fill the frame with your model. It was the first thing we were taught about taking photos. But don't do it, please! Also, always send the highest resolution image, and if you leave plenty of breathing space around the subject, then we can work wonders. Trust me!
Perspective
Next, let's discuss helping the eye see a 3D image on a 2D medium, the screen of a computer or phone. To help with this, you want to take photos that show perspective. This means a little bit of the top, sides, and front all at the same time. Perhaps taken from a 45° angle.
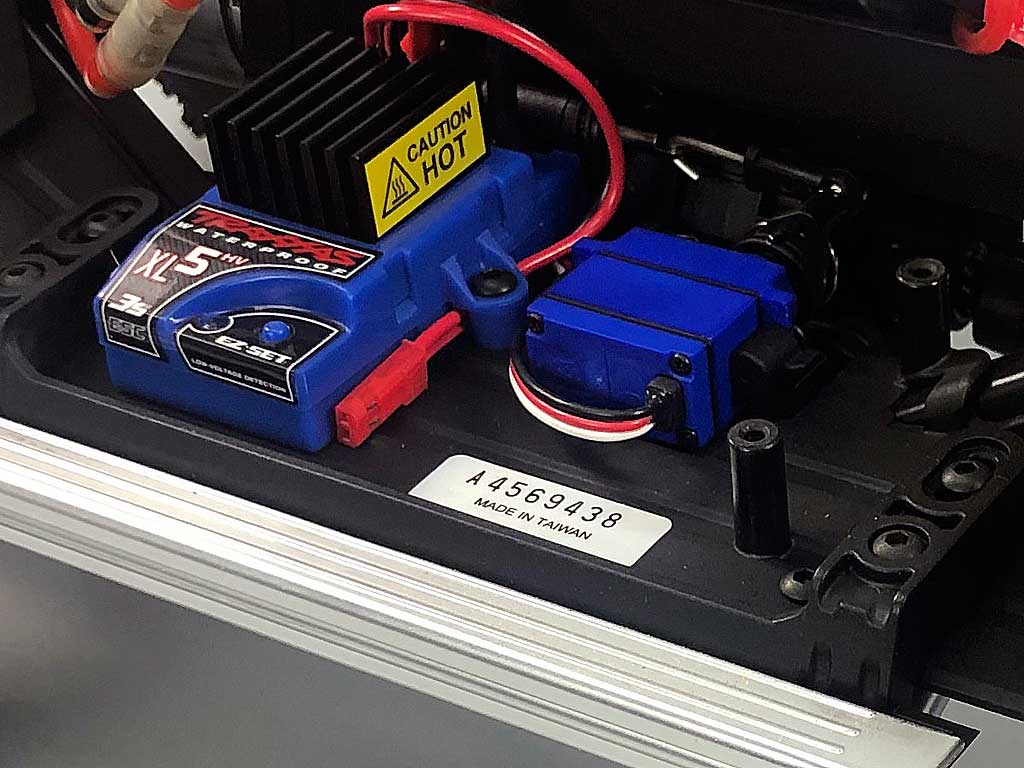
Rule of thumb: never align the servo, or the linkage perfectly horizontally or vertically.
Reason this is a terrible image is because it's from a high angle. It's almost perfectly a top view. Problem with this is it doesn't help the eye see the 2D photograph as a 3D image with volume. For that you need a photo showing 3-sides of a product.
A nice photo except it shows nearly the top view and this doesn't show perspective.
Thing is, to fool the eye into thinking it's seeing a 3D image, we need perspective so an ideal photo of this same servo shows a bit of the side, the front, and the side.
Means it's taken at some angle ranging between 30 and 60° so about 45° from the front and top is near perfect. A free article that delves into the subject in far greater depth is available from Adobe online. It's titled;
Meanwhile, what we're going to do is give you the nickel tour instead. So, because I didn't like the above photo due to it showing too much of the overhead view, allow me to share the same servo installation, but this one shows a bit of the side, front, and top. It perfectly demonstrates why we want perspective in our photographs.
Remember, good perspective allows a 2D image (a photo), to convey 3D information like this next photo. It's an excellent example of the exact same servo/linkage shot with perspective.
- Note how this photo shows the top, the side, and the front at the same time
Recapping3
Thus far we've discussed landscape (wider than tall) and portrait photos (taller than wide). We've touched on focusing (literally discussing the touch focus feature on phones) plus a bit about framing. This, with an emphasis on not getting so close to the image that it impinges on the breathing room. This, breathing room being what we need around a subject to give us flexibility to use the fullest extent of the photo to tell a story by zooming in plus panning and scanning with the photo. Plus, we touched on perspective, or how we can better fool the eye into seeing a 2D image in 3D by showing three sides of a product (side, top, front).
Next we're going outside to see what we can learn about taking photos mostly in landscape mode, but not always because when we take hero photos, we want to use portrait mode.
Next, let's go outside to take photos. Again, we'll mostly use landscape mode, meaning we hold the camera sensor sideways so the image is wider than tall, but not always.
Outdoors photography
When working on an article for the website, often, I still need a HERO image plus one of you and the model. What follows are several images showcasing both what goes right and wrong. Remember, I need two images, one of you with the model, plus one of the model alone.
Both are *best* taken vertically, like this - camera sensor vertical, like for a selfie. This one is absolutely perfect. The image he sent was 5MB and worked out great! Beginning from this.
- This is how we love to receive an image, high rez and framed in portrait orientation
And the reason is, we end up with this without extra work - yippee!
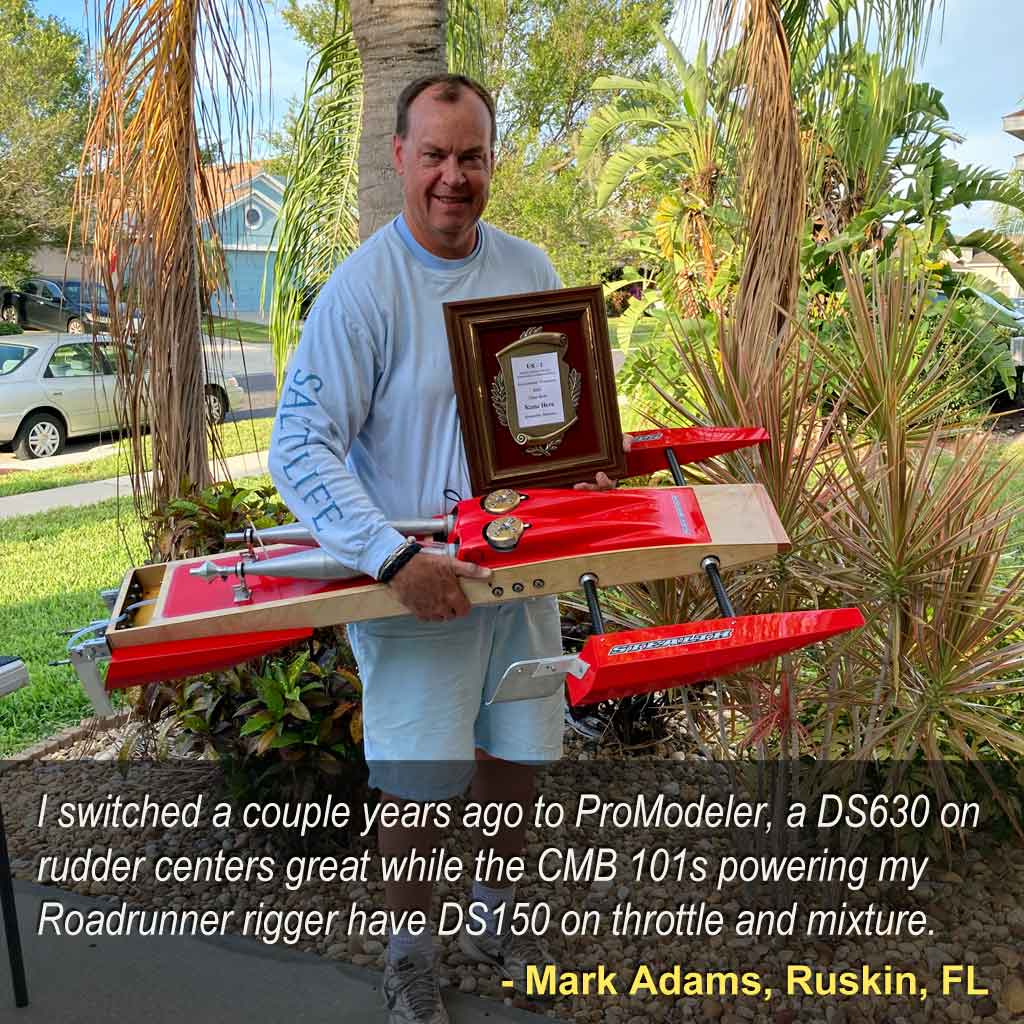
So this image of Mark and his Roadrunner boat? It turned out perfect because it was taken with subject centered both vertically and horizontally, *and* with plenty of breathing room around the subject.
Left us enough room with which to work because as the original image demonstrated, we usually have *some* processing work to perform. Thing is, because whomever is taking it doesn't know *what* I have to do, I need them to leave us some breathing room around the subject.
The “what we need to do” varies depending on where within the article it gets used. Breathing room around the subject is our friend. Next are examples of what goes wrong.
What goes wrong
What goes wrong is usually a variation of lack of breathing room around the subject. Biggest mistake is getting too close. Usually, it involves cropping off part of the image. Examples of dos and don't, follow.
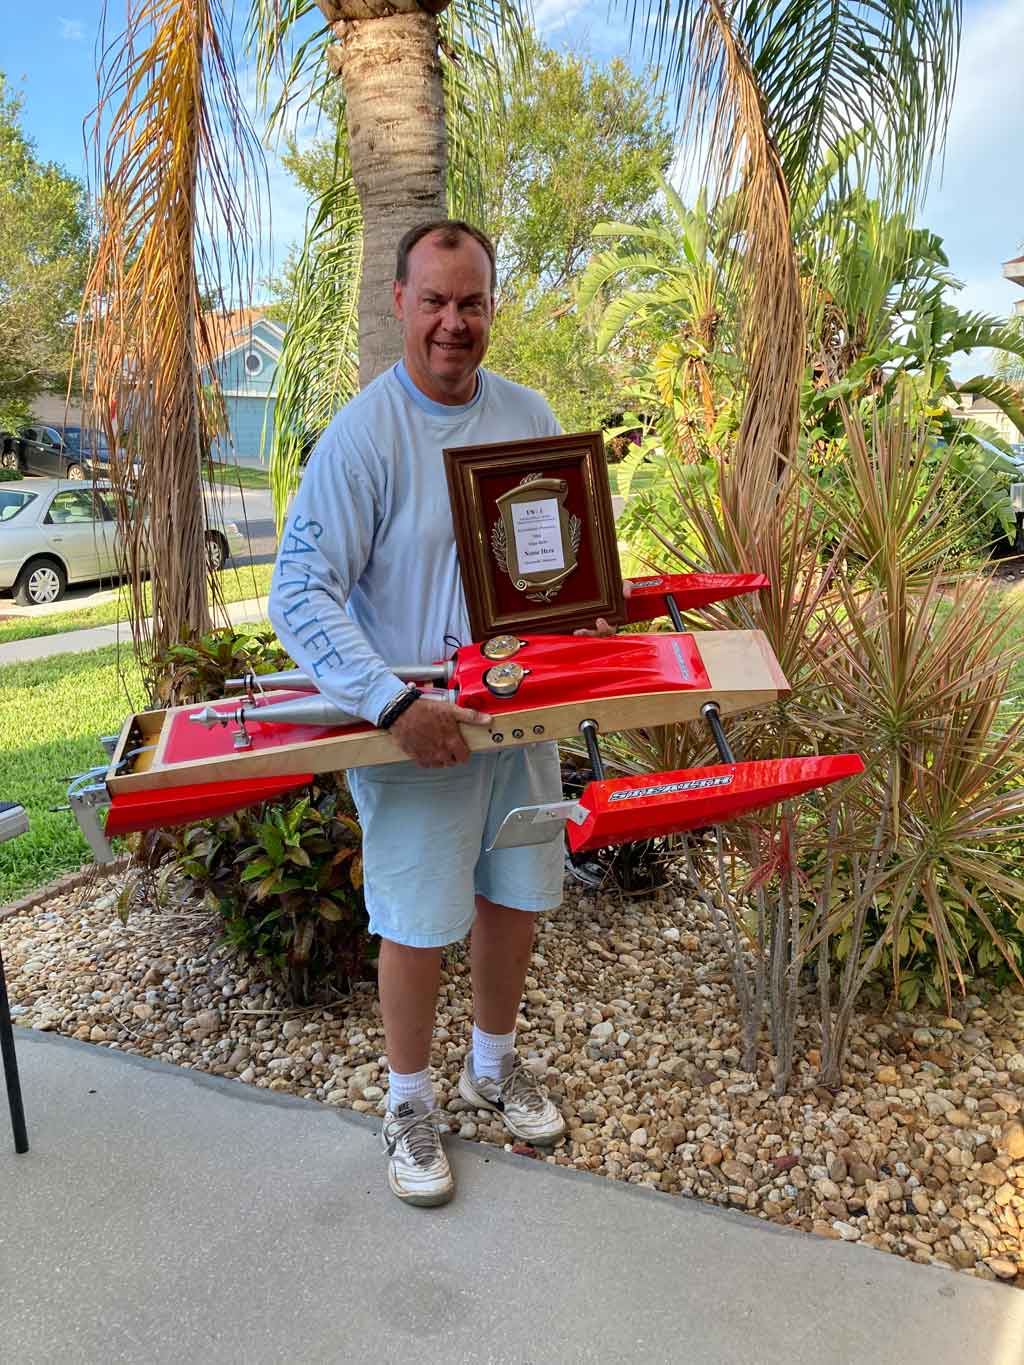
So, this next photo would have been a lovely to use but the photographer (his wife so he had to be careful with criticism) got too close. Unfortunately, this led to cropping off part of the subject (boat on right side and trophy on the left). So I can't do anything with it but ask them to re-take it.
Basically, a good photo doesn't have *any* part of the subject cropped off - none!
- Almost a perfect image rendered useless for lack of breathing room - sigh.
Here's a similar example, where again, sensor is too close and cropped off part of the subject.
- Really nice photo made useless by framing so tightly part of the image was cropped off - sigh
And finally, here's a great job. Again, taken like a selfie, sensor vertical, centered within the image, and NOT too close to the edges. Centered nicely side by side and top to bottom. And because as long as I receive the highest quality out of the phone, typically 3-7MB, then I'm golden and can do what we need to in Photoshop. This is a GREAT example image!
- Perfect portrait mode photo - centered vertically and side-to-side - not too close to the edge
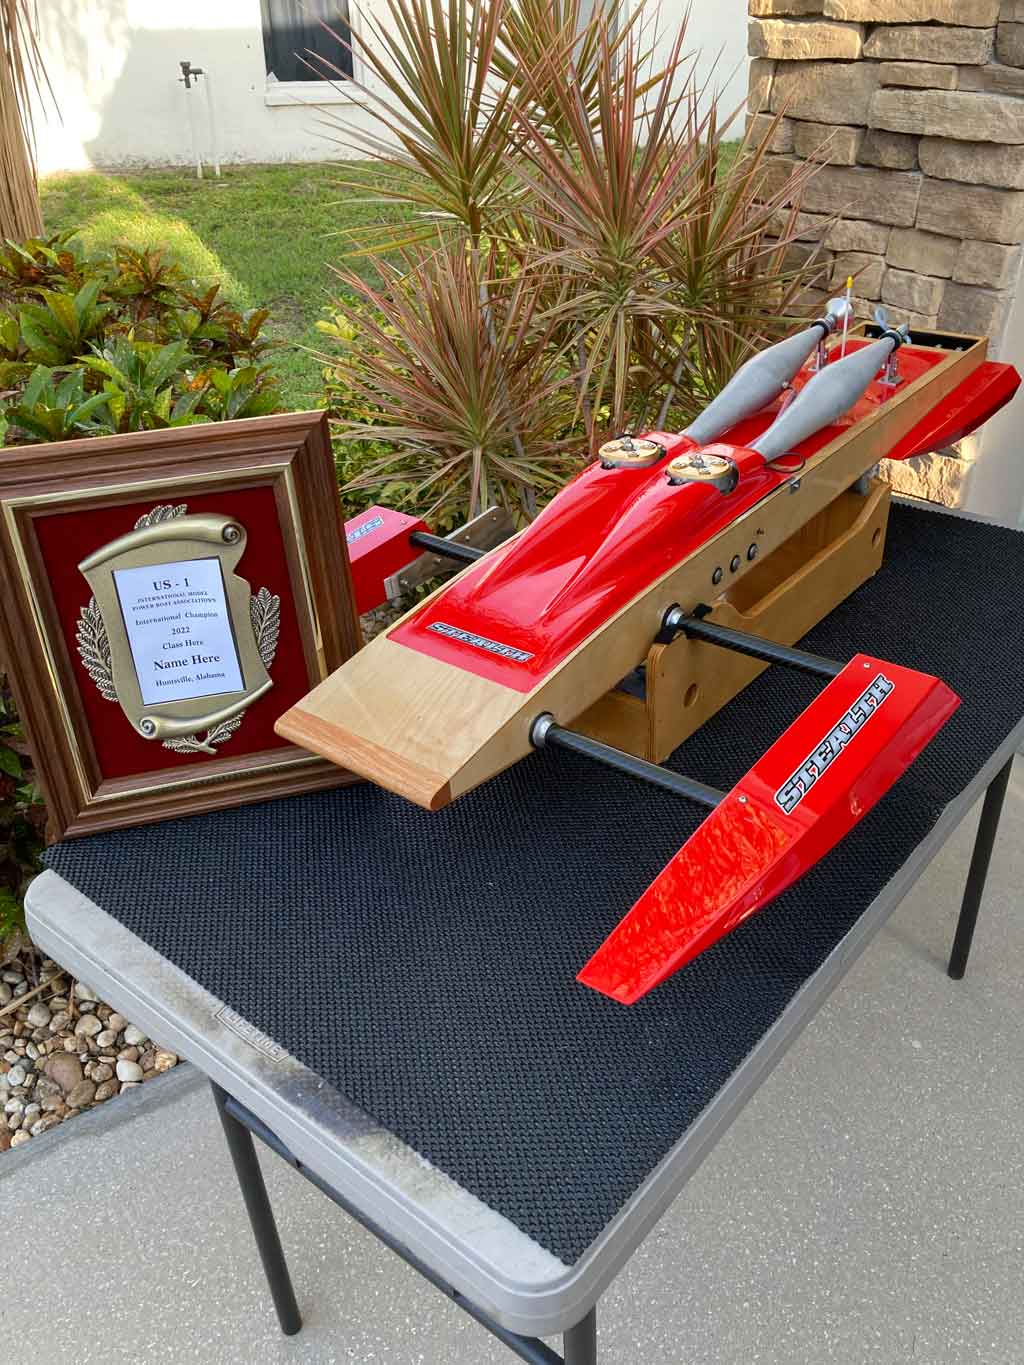
Next, a photo of the model by itself which turned out perfect for us. Note how he left us plenty of breathing room around the model both left and right and while not perfectly centered vertically, it's plenty close enough for our needs!
- Plenty of breathing room around the model and not too close to the edge of the frame
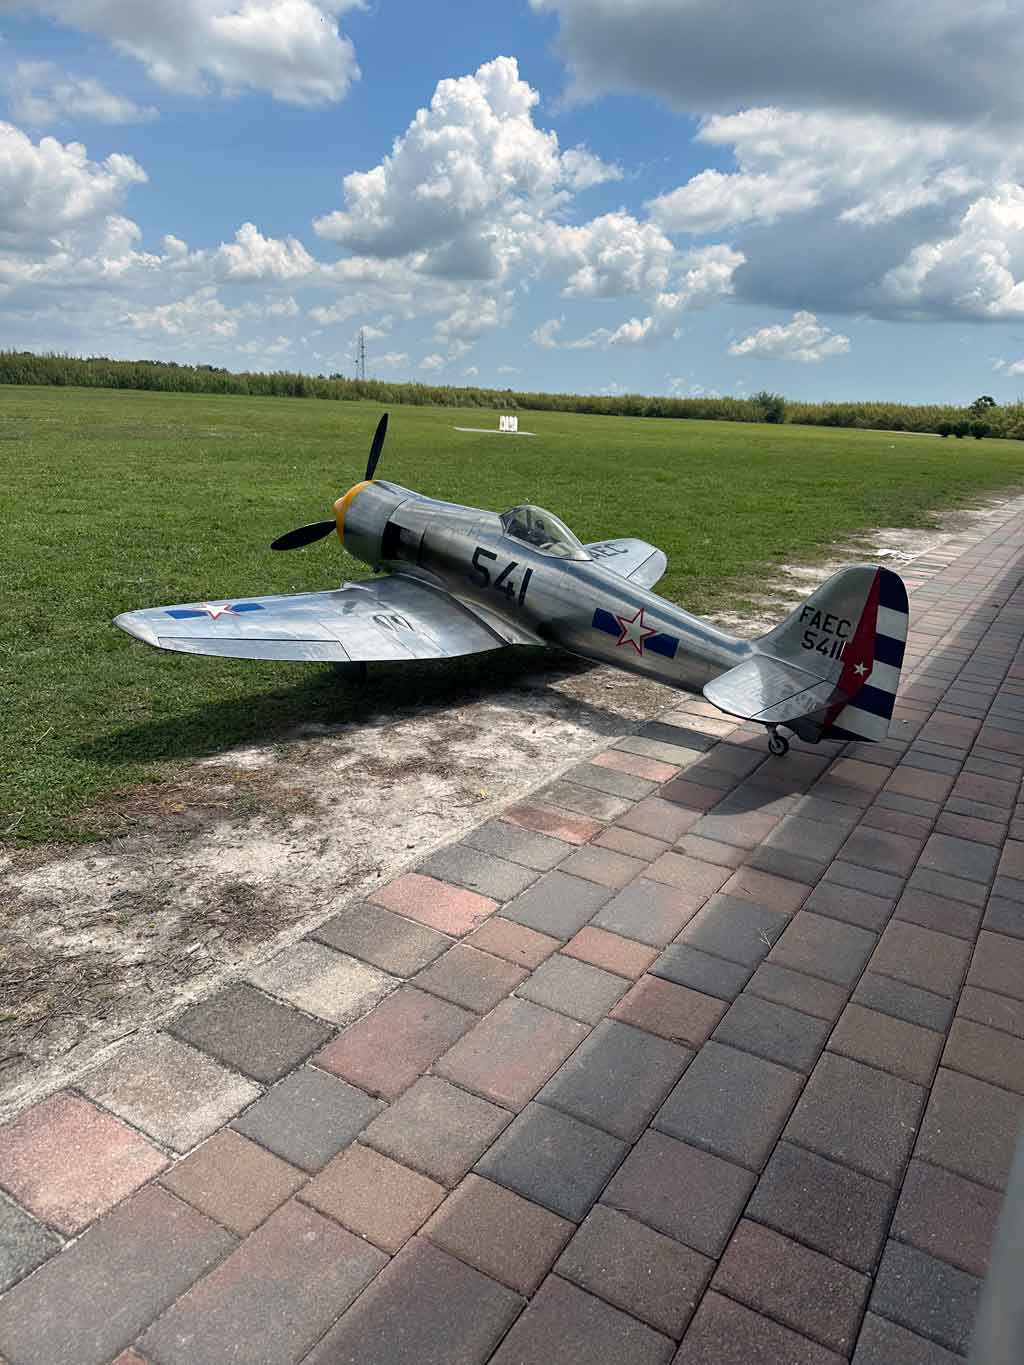
And here it is, a final image of the Seafury ready to use, a great hero image.
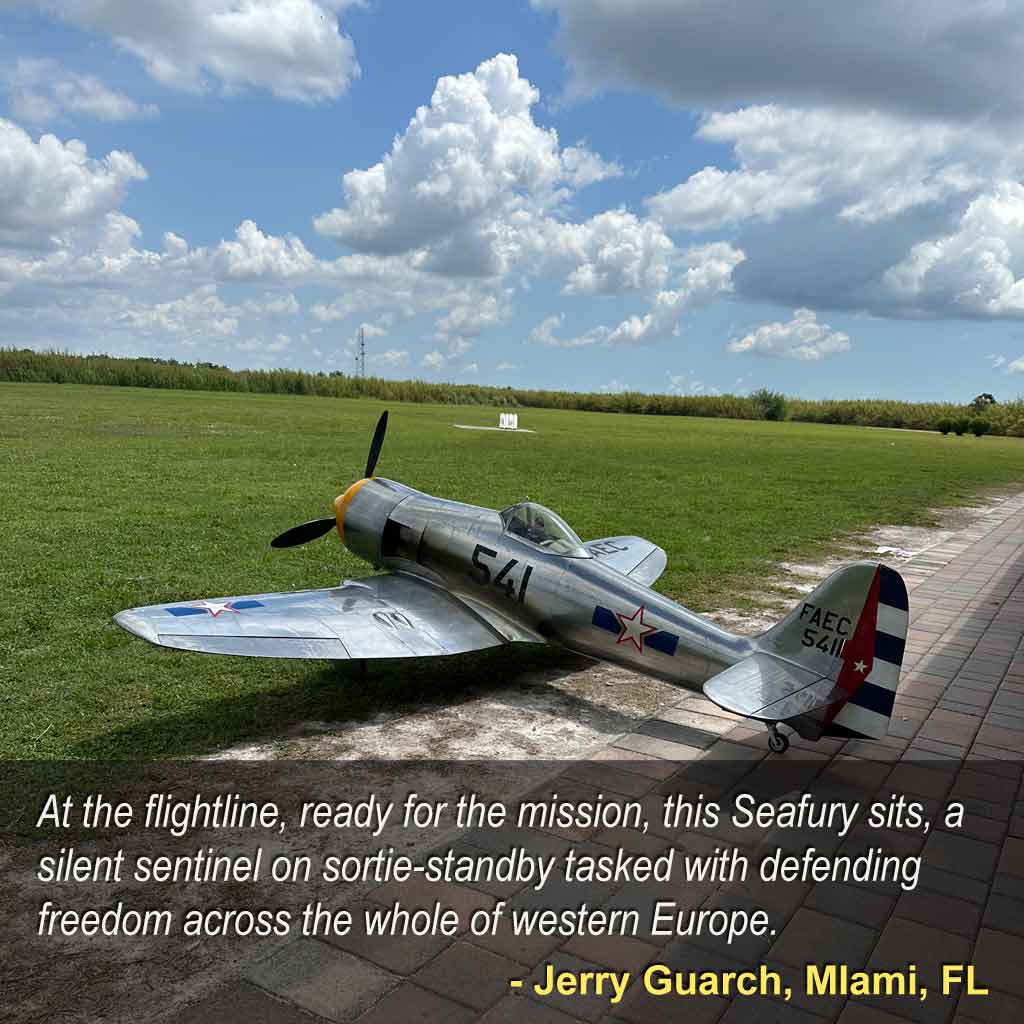
Now here is one last example, again where the image has perspective. The photographer was careful to snap an image that's not too head on or side on, but quartering. It fools the eye into seeing a 3D image.

And note how similar the above image is to one off the Arrma website where the pros took it.
Finally, to the hero images, the ones with customer quotes. I always want these in portrait mode, with the pilot and model centered side-to-side, and vertically top-to-bottom. Unfortunately, I often get landscape photos. So, what do I do? I fix 'em. How? Again, using Photoshop, the work involves cloning to create what's not there.
Hero photos and how to fix them
As an example of what *not* to do. No offense but almost 100% of the photos I receive are taken in landscape-mode because that's the usual rule for photos. But what *I* want for a hero image begins in portrait-mode expressly so I can crop it to what I need, which is square. But folks don't know what I want, so I figure better if I show them. Basically thinking maybe then I'll begin getting more hero images in portrait mode to begin with (really meaning, ultimately, less work for me to do to 'fix' them).
So when the sensor is used in landscape versus portrait, even the best photo in the world requires extra work because it's natural for photographers to want to frame the object of interest fully. This, because they're thinking, "I'm taking a picture for print".
But in fact, I'm asking for a picture to be used digitally, and *not* print because I can manipulate an image within Photoshop and present day sensors are so luxuriously large, I'm actually happier if the photo is taken where the 'photographer' thinks, I'm too far away, let me get closer (or more typical these days, they zoom in, which is really bad as it's giving away resolution). This, by the way, is the same thing as happens when a modeler fits a servo arm that's too long and cuts down the ATV from 100% or 80% (thus, the smart pilot moves the control ink *in* one or two holes to reduce throw just like the professional photographer moves in or out from the subject instead of zooming. E.g. it's applying a mechanical fix of the issue when he needs less throw versus doing it digitally via ATV, which gives away servo resolution, but I digress, again.
This brings up another point, you get a better image if you physically move the sensor closer or further away versus using the camera's zoom. Back in the day, photographers knew this also, which is why they had a range of interchangeable lenses each used based on what they needed to do, but I digress yet again!
Due to my being a fundamentally lazy guy, I have an email I usually share with folks when I grok they're willing to take some photos for me. This developed recently and *after* I had received a T-33 photo. Anyway, now I am expanding on the email with an actual photo-tips article for the site (again, me being lazy because a link is easier to send than performing a copy-and-paste procedure).
So basically, the teaching technique involved is the classic show what's wrong, and then show what is involved in *fixing* an otherwise great photo. This, in a teaching attempt offer via example in hopes of subsequently receiving more correctly framed photos to begin with. Remember, this is all about me using photos for *my* purpose - in this case, to create hero images versus photos taken for a Kodak moment. So these tips are for the purpose of teaching folks what I prefer and why I am asking them to kindly turn the camera sensor 90° from landscape (what we're taught) to what's called portrait orientation (thereby breaking the usual rule) but just for this *one* particular photo.
Anyway, I trust you don't mind being the subject of a tutorial. I selected it because I was doing your photo while I am working on the tutorial as I have hundreds to choose from but your model is so pretty and the image is well lit. Here's the 5-photo teaching sequence . . .
This a really nice photo *but* the sensor is in landscape position - wider than tall. Gonna have to perform some Photoshop work to make it usable. Fix it so to speak. Here are the steps.
So the 1st step is to create what's not there by extending the virtual canvas in Photoshop.
Then the 2nd step is to begin cloning, sometimes it's hard, sometimes it's easy, this was easy.
And when I'm done, while not perfect, because I'm going to cover it up, I have in effect created something from nothing. How? Simple, by filling in the nothingness by cloning. This one was easy as I had clean paving in front of the model. Sometimes I have grass to work with.
Anyway, the end result looks like this.
Now I can add the caption, and creating where to do this without cropping into the model was the purpose of this exercise. So, we used the cloning tool within Photoshop to do what needed to be done with the photo in order to have extra space where the caption was added.
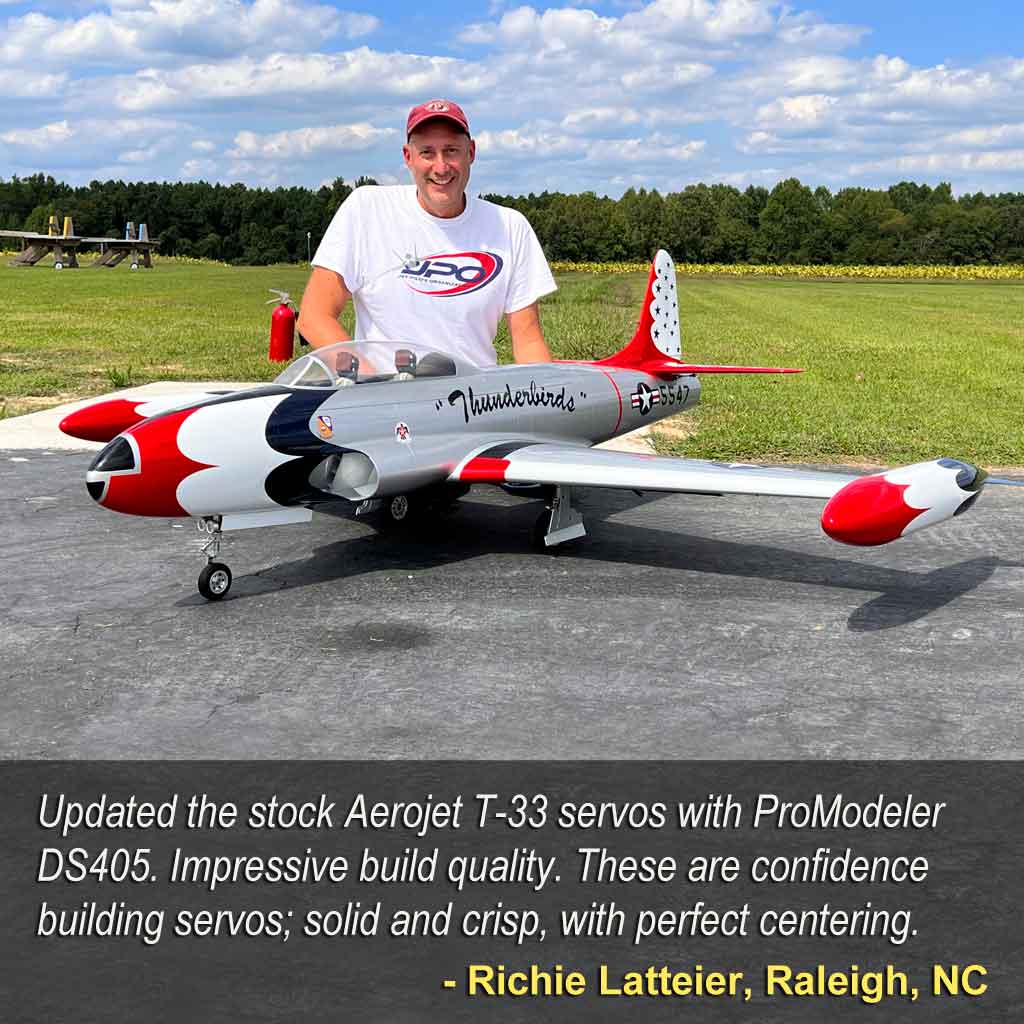
As to why this matters, it *only* matters because *we* like for the text background to be a bit transparent and thus allow it to barely show through. For our purposes, the cloning doesn't have to be perfect, just good enough to give a sense it's there. If it had to be perfect, the cloning could be better, too.
Q&A
So after publishing this article, a fellow modeler sent a photo of some hardware asking if the photo was in the perspective I was seeking (it was not). So I explained why it wasn't and then thinking others might have the same questions, decided to expand a bit on this article by sharing a few more example photos demonstrating how photographers force perspective. Let's review how I responded
Perspective - it's forced expressly to fool the eye into seeing 3D on a 2D display
To be in perspective, a photo actually needs to be with the lens at a 45° angle to the subject and looking down at about a 45° angle, also. So your hardware photo came in like this one I took some of some knives to serve as examples . . . like yours, from directly overhead and everything squared up to the camera sensor.
A subject squared up is the cardinal sin of photography. This means, in this photo of a table knife, the length of the knife is aligned with the lower edge of the sensor (right to left).
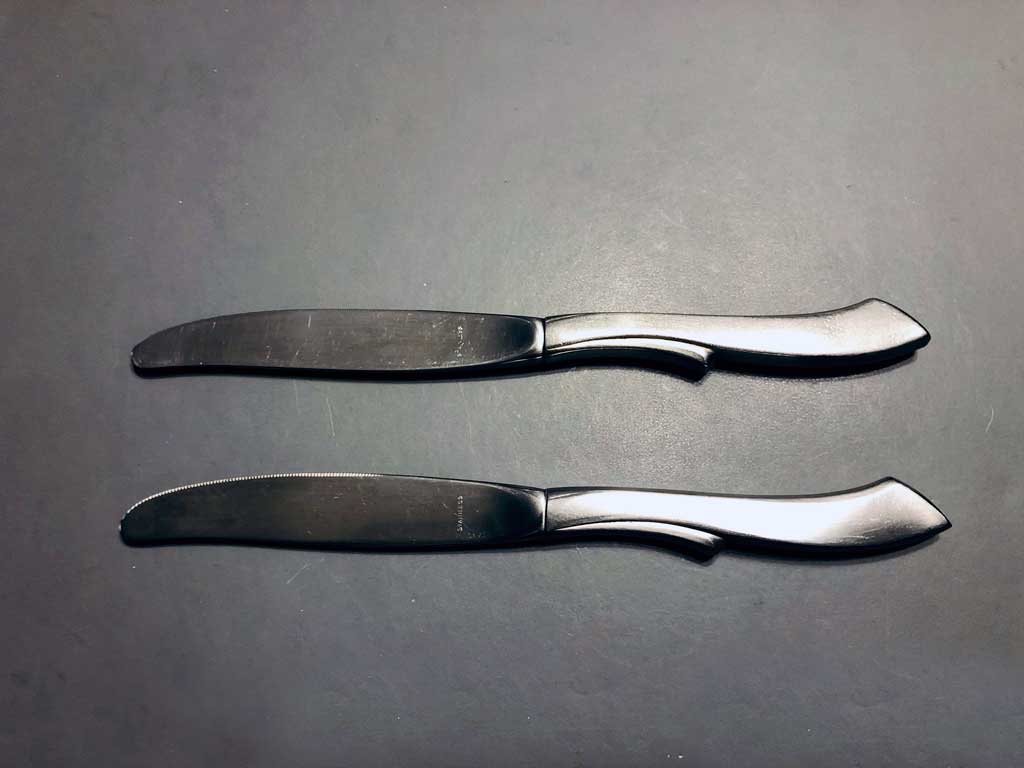
- Photographed from directly overhead and squared up to 90° the image sensor
And in forced perspective, the hardware should be presented more like this - 45° off-axis such that not axis of the product is aligned with the horizontal or vertical-axis of the image-sensor.
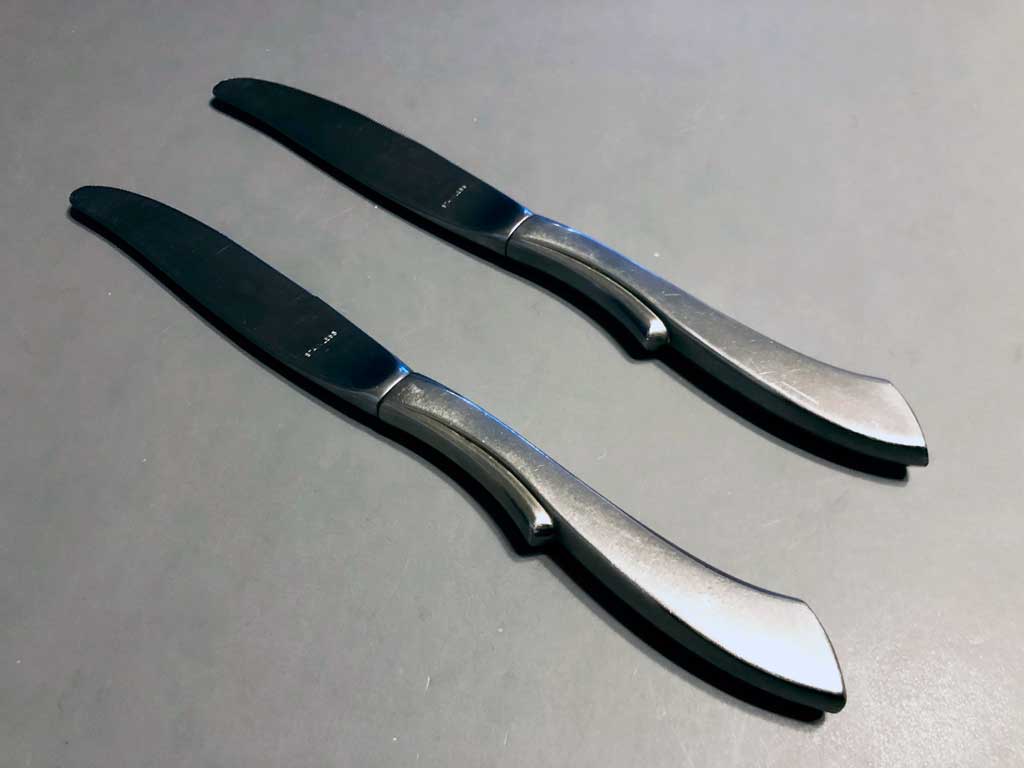
- Being off axis is what expressly triggers the eye to see a 3D image on a 2D screen.
Here's another example used to help demonstrate the use of perspective. We have a lovely photograph of an Edge 540, and while this photo is composed and photographed from about 45° above for a certain purpose (to show off the wing area and straight leading edge), once again the subject is squared to the image sensor (fuselage aligned with the width of the image). This one was done on purpose so the cardinal rule is broken on occasion, *but* there must be a reason like this one where the photographer *wanted* to showcase the defining feature of the Zivko Edge 540 wing planform (if you're unfamiliar with the term, planform is expressly a word for describing the shape or outline of an aircraft wing as projected upon a horizontal plane). So while I am using the photo as an example of what not to do for a HERO image, this net image one was taken this way on purpose.
This is basically a side-on photo with *some* aspects of perspective (at a 45° down angle). And in general, when shooting for HEROs, you want the fuselage NOT to be aligned with the image sensor edge like this, left-to-right.
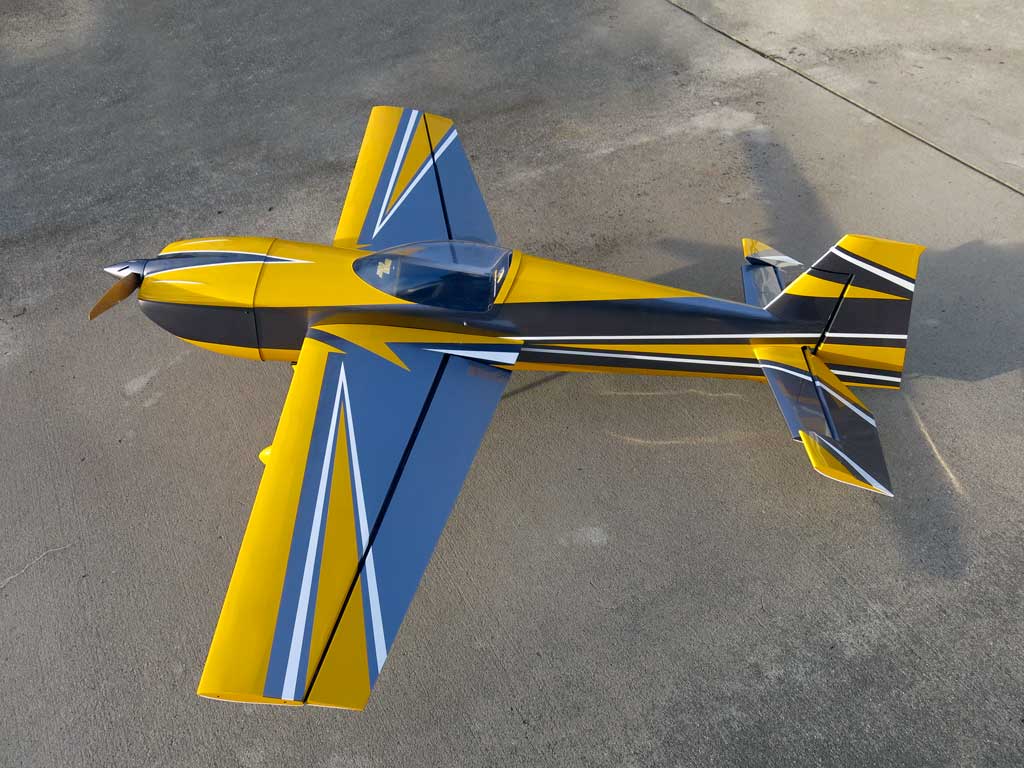
- Side-on semi-perspective taken from above, at about a 45° downward line, to show planform
This next photo is perfectly composed. Again an Edge 540 - but photographed in perspective such that the fuselage does *not* align with the width of the image sensor, nor the height because the fuselage is presented at about 45° from the nose, and also from a similar elevation of about 45° looking down. This is about as good as it gets.
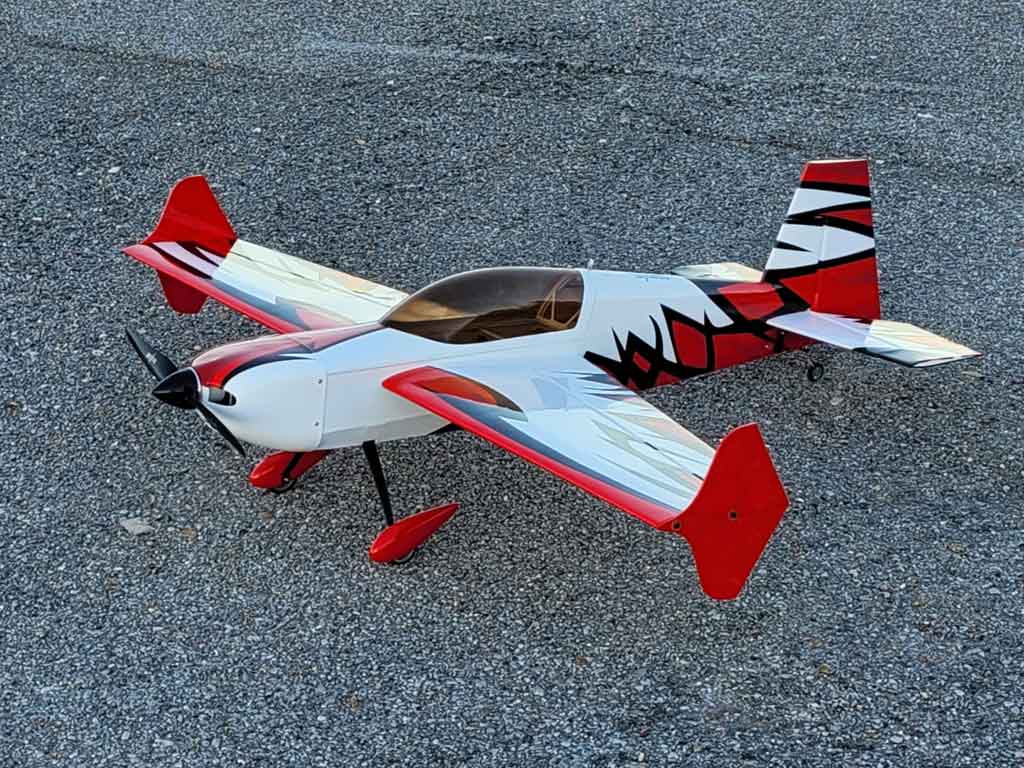
- Superb perspective shot - no part of the model aligns with the sensor's edges!
And note, the actual angles in the above photo don't have to be perfectly aligned at 45°, they can be at 30°, 60°, whatever. Maybe try taking several photos each varying the angle and see if one works better than the others. -Again, this is nearly an ideal perspective photograph for our HERO-use because it's 45° off-axis the side and from above - the model's fuselage and wing DO NOT align with the vertical or horizontal edge of the image sensor.
Here's another excellent example of forced perspective, again off-axis by about 45°, also taken from above (standing height works great) but this time . . . from the rear quartering view.
- Quartering perspective, 45° off-axis but this time from behind.
So while it turns out standing height works out nicely, kneeling height (maybe a 30° downward angle instead of a 45° angle) may offer up something that changes everything in how you perceive the model. And yes, the effect can be rather subtle.
Once again, same model, now a downward angle of 30° versus 45° and taken at dusk you infer form it, end of day (but it may well have been taken at dawn as both constitute what in photography are called the Golden Hour.
Golden Hour in photography terms is the last hour of the day and the first of the morning. If the sun is half-way up/down over the horizon, you're right in the middle of it.
Want to learn more, this Adobe article Golden Hour is a great primer on the subject and explains how to spice up your game. And as usual, clicking opens a separate browser tab so you don't lose your place within this article.
- A lower composition (30° downward) isn't to be overlooked as it sometimes adds drama!
So what do you think of the above photo as compared to one preceding? Do you like the lower angle better, or do you prefer the higher angle? Can you discern at golden hour is when it was taken? The tip off is the gold-ish hew to the light glancing off the wing and canopy. Only happens then which is what makes it special.
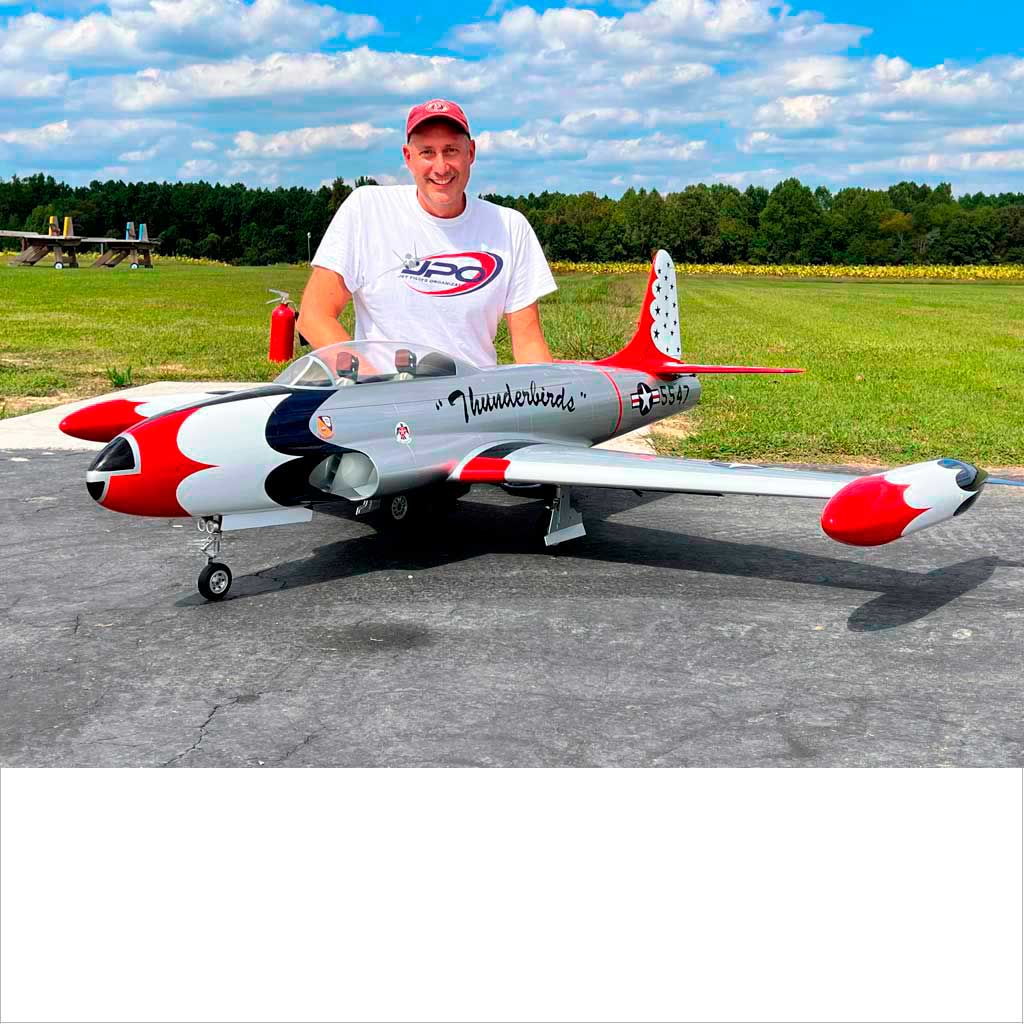
Finally, and this is an important reminder, the hero should be framed in selfie mode (image sensor is presented taller than wide). The wingspan is more or less centered side-to-side, and with about equal amounts of runway (or grass) above and below so what you capture looks something like this.
- Mall parking lots are great places to grab a good HERO image!
So because the photographer gave me a 4MB image, I had plenty of resolution to work with. I was thus able to both zoom-in and crop a bit to get what I wanted.
This is the final result of the above image uses of the 48" Extreme Flight Edge 540 for a HERO for the article titled; Extreme Flight 48in Edge 540 setup - nice model, too.
Click the link to review the article as we basically guide you toward several alternative pieces of gear/equipment for when setting up your model. This one is a real tiger, too!

Note; customer-hero photos (a model airplane with customer framed together) often work great from kneeling. No, not always, sometimes! However, what is an *always* is the use of forced perspective, so the fuselage is at a 45° angle to the edges of the image sensor.
Putting it all together - the effect of resolution on what we can achieve
So remember, while we don't care for photos taken from directly above, in front of, or side-on, you as the photographer are Johnny-on-the-spot taking the photos. Since digital photos don't really cost you (not like film did back in the day), then take plenty of photos. Experiment!
Note; it's by experimenting that photographers develop their craft. Then send us what you deem to be the best ones, e.g. you cull the ones that you just don't 'like' and then we (like editors at a magazine or newspaper), will pick what we like best, e.g. cull yet again. So send plenty of photos and give us something to work with when deciding which ones to actually use because we know what it is we're trying to accomplish with the photos.
Just remember, far better to begin with a photo shot in portrait mode (selfie, image sensor held taller than wide) and with plenty of breathing room around the subject. That, and don't worry if you feel it's framed from too far away because if you send us a high resolution image, then we can almost always make it work. How far away can we salvage an image and use it?
As long as it's in focus, look what we did with this photo, beginning with this . . .
. . .and zooming in digitally using Photoshop and ending up with this.
. . . so now let's see what the exact same photo, but received at 180KB, before and after so from this photo, same as the first in this sequence just differing in the resolution . . .
. . . and doing the exact same zoom and crop, the second photo looks like this due to it arriving at <200KB of resolution versus 4MB of resolution.
. . . can you see how there's ringing around the photos that began life at lower resolution. The pictures are the same-same with the sole exception being the photographer sent us the camera originals for the phone instead of sending ones that had been down-sampled by the phone's software.
Big difference, right? And here's what really interesting - all of the images - these ones being shown to you right *now* are being presented at about the same weight of ~60KB each. The difference is 100% due to where we began, or as the old computer scientist phrase goes . . .

Summary
So we've discussed, we can use the image sensor in the camera for both portrait (or selfie-mode where the sensor is held vertically so the photo comes out taller than wide) *or* in so-called landscape mode (where the sensor is held sideways so the image comes out looking wider than tall) . . . and which is best is a matter of what it is you want! So it depends. Is this a familiar refrain with me?
We also touched on composition and framing. Meaning how we want forcd perspective so the long axis of the subject does not align with ether the bottom or the sides of the image sensor, but instead forms a 45° angle. And how it's nice to shoot from a 45° downward view, and how HEROS of the model, or model with person, should always be composed with perspective and taken in selfie mode. So we don't want photos that are head-on, or side-views but have a bit of the side, front, and top. This, so as to better fool the eye into believing a flat 2D image is an actual 3D object.
Then we've also discussed the value of the touch focus feature on the phone (to aid in obtaining good focus) and discussed the value in leaving plenty of breathing room around said subject. This to allow us to zoom in as well as pan and scan within the high rez photo.
Speaking of which, we've explained why it's important to receive a photo of at least 3-5MB so what we end up with is pleasant to your eye. So we always prefer beginning from 3-5MB instead of from maybe 135KB.
We've also shown you how we correct a shot framed in landscape to be able to use it by adding what's not there using Photoshop but also asked you to please help us by beginning from a self-selfie mode image.
I'll close with this. If there's any part of this you don't understand, or think is flat out wrong, reach out to us. I'm easy to find at 407-302-3361 or via email (better): info@promodeler.com